Photoshop Action (Basic – Advance)
Part-02: Photoshop Actions Panel Menu
Insert Menu Item & Insert Stop.

Button Mode:
You can switch to this mode by clicking on the Actions panel menu and selecting “Button Mode”. The big difference between this and the list mode is that in button mode you can see only the action name and not the commands themselves.
List mode:
In the default display, each action appears as a folder-like heading. You need to be in List mode when you record an action and when you edit individual steps. List mode also lets you perform only a select number of steps in an action.

Insert Menu Item:
Insert a non-recordable menu command:
Photoshop Actions are great for speeding up or automating repetitive processes. Most, but not all commands can be recorded in an action like painting and toning tools, tool options, View commands, and Window commands.
We can insert a command when recording an action, or after it has been recorded. No values for the command are recorded in the action. If the command opens a dialog box, the dialog box appears during playback, and the action pauses until you click OK or Cancel.
Note:
When you use the Insert Menu Item command to insert a command that opens a dialog box, you cannot disable the modal control in the Actions panel.
- Choose where to insert the menu item:

2. Choose Insert Menu Item from the Actions panel menu.

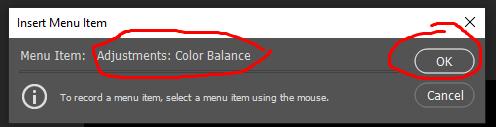
3. With the Insert Menu Item dialog box open, choose a command from its menu.

- Before click to Color Balance using a mouse, insert Menu Item show Non-Selected
- After Click to Color Balance, it Shows and clicks ok.
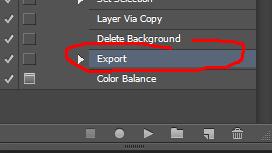
- After that color balance will appear in the actions. Now you Can Play it.

Insert Stop:
A stop is a dialog that pauses the action to display a user-defined message of up to 254 characters.
We can also display a short message when the action reaches the stop as a reminder of what needs to be done before continuing with the action. You can include a Continue button in the message box in case no other task needs to be done.
- Choose where to insert the stop by doing one of the following:
- Select an action’s name to insert a stop at the end of the action.
2. Choose Insert Stop from the Actions panel menu.

3. Type the message you want to appear.

- If you want the option to continue the action without stopping, select Allow Continue.
- Click OK.
Note:
You can insert a stop when recording an action or after it has been recorded.